Creepy Crawly Brownie Spider Bites
By Paula Deen
JUMP TO RECIPE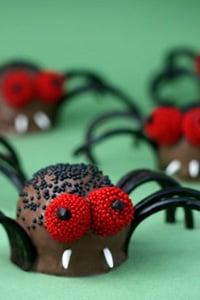
![]() Difficulty: Medium
Difficulty: Medium
![]() Prep time: 25 minutes
Prep time: 25 minutes
![]() Cook time: 25 minutes
Cook time: 25 minutes
![]() Servings: 25
Servings: 25
Ingredients
- 4 oz chopped unsweetened chocolate
- 1 cup Butter
- 2 cups sugar
- 4 eggs
- 1 teaspoon vanilla
- 1 1/2 cups all purpose flour
- 1 to 2 (16 oz) packages (also called confectioner's coating, candy melts or bark coating) chocolate candy coating
- 10 licorice wheels
- 50 (you can also use red candy) raspberry gumdrops
- black nonpareils
- white cylinder sprinkles, for spider fangs sprinkles
Directions
For the brownies:
Preheat oven to 350 °F and grease an 8-inch square baking pan.
Heat butter and chopped chocolate in microwave on low. Microwave in 30 second intervals, stirring in between until melted and smooth.
In a mixer, add sugar, eggs and vanilla. Mix until combined.
Add the melted chocolate and butter to the sugar mixture and mix until combined.
Add flour and mix until combined.
Spread the brownie batter in greased pan and bake for about 40 minutes or until done. Let cool.
If you want, you can also use brownies from a box mix and just follow the decorating instructions below.
Makes 25 spider bites, more if your roll into smaller balls.
After the brownies are cooled, (they can be still be slightly warm) cut 25 equal brownie squares, trimming off the outside edges first. This will help when you start to roll them.
These brownies were so moist and moldable already, I decided to try rolling them without using any frosting. And it worked out just fine.
To decorate:
Prepare the licorice legs first. Unroll one licorice wheel at a time and cut it into as many 2 3/4 inch sections as you can. You can separate each strand of licorice by pulling apart the two pieces. Start on one end and pull the two pieces apart, leaving them attached at the other end.
Repeat until you have four pairs of legs for each spider body. (totaling eight licorice legs each.) Set them aside until ready to use.
Prepare the raspberry gumdrop eyes second. All you do for these is cut small pieces of the leftover licorice and press directly into the tops of these raspberry candies. The candies are soft, so don’t be afraid to press down firmly to get the licorice pieces to stay.
Start dipping! Place the candy coating in a small, deep microwave safe bowl. Heat in the microwave on low in 30 second intervals, stirring in between. Repeat until melted and smooth. Don’t overheat the chocolate.
Drop the ball in the bowl of chocolate coating. Don’t stir or move it around. Then cover it by spooning more melted chocolate over the top, completely covering the brownie ball.
Then, using the same spoon, lift it out of the chocolate and tap the handle of the spoon on the edge of the bowl. This will force any excess chocolate off the ball and back into the bowl. When most of the excess has fallen off, transfer the ball to a wax paper-covered cookie sheet and immediately sprinkle a few black non-nonpareils on top. Repeat with remaining brownie balls.
Let the spider bodies dry completely before applying the rest of the decorations.
Use the remaining chocolate candy coating to attach the licorice legs and candy eyes. You won’t need much, so just reheat what is left in the bowl that you used for dipping. Place the top (attached) part of the licorice leg pair in the coating and then attach it to the side of the spider body. Hold in place for a few seconds while the chocolate sets. Repeat with remaining legs. Don’t move the spiders until the coating has completely set with the legs attached.
Then, use more candy coating to attach the raspberry candy eyes and let dry.
For the finishing frightening touch, insert two sprinkles for fangs (I used white stick (cylinder) sprinkles). Just push them right in and have a frightfully Happy Halloween!